One of the pleasures of having an April 30th Halloween is that the lead up is free of all the trappings that precede Halloween in October. I love the fun build up to October Halloween but I also love that the days leading up to April Halloween have special and appropriate significance for me.
April begins with April Fool’s Day which is one of my “New Year” days on which I review the journey I have been on and plan for the journey ahead. In the middle of April is Bat Appreciation Day followed by Bram Stoker’s Death Day and ANZAC Day. The month ends with both Walpurgis Night and Halloween!
Halloween is one of many different days observed around the world that is dedicated to remembering and honouring our dead. The cultural importance of these days suggests that for many, “Til Death Do Us Part”, doesn’t really work. As I get into the Halloween spirit, I remember my beloved dead and how the ties I have with them have not ended even though they have departed from this realm.
This year I began Halloween by having morning tea at the Fawkner Tearooms situated in Fawkner Memorial Park.
It’s evening now and I’m preparing mint tea and cakes for a very special Halloween Mourning Tea. To begin:
Set a table as you would for a Silent Supper, with one place set for each guest and one place of honour set for your departed loved ones.
Place food that reminds you of your loved ones on the table, placing a special offering on the plate for the dead. (I had coffin shaped chocolate cakes reserved for this occasion from my Deadly Surprise Cake, giving them new life by drizzling them with peppermint icing).
Place drinks that remind you of your loved ones on the table, pouring a special offering into the cup for the dead.
While you eat and drink, think about your departed loved ones.
There is no right way to do a Silent Supper. Just do what feels right for you.
I created my own Mourning Tea ritual, inspired by the elaborate preparation and serving of Moroccan Mint Tea. A traditional Moroccan Mint Tea ritual combines a powerful spiritual and culinary journey that is beautifully described in this Maghrebi poem:
The first glass is as gentle as life, The second glass is a strong as love, The third is as bitter as death.
Mourning Mint Tea

Ingredients (enough for three guests)
small bunch mint leaves
3 cups boiling water
1 tablespoon peppermint tea leaves
1 tablespoon black tea leaves

Instructions
Place the fresh mint in a teapot.
Pour in boiling water and steep for eight minutes.
Fill the honoured guest cup a third of the way then pour a small serve of tea for each guest.
Add the peppermint tea to the teapot and steep for 6 minutes.
While the tea is having its second brew, relax and enjoy the gentle mint flavour of the first brew.
After six minutes, strain the tea into each cup following the ritual above.
Add the black tea to the teapot and steep for 4 minutes.
While the tea is having its third brew, relax and enjoy the stronger peppermint flavour of the second brew.
After four minutes, strain the tea into each cup following the ritual above.
Enjoy the bitter tea flavour of this third brew.
When you are ready to finish the ritual, pack everything up except the cake and tea reserved for your loved ones. If you can, leave them on the table overnight and then bury the cake and pour the tea in your garden on May Day.

Note: If you have a pot warmer or tea cosy, it will help keep the brew hot throughout.
Bram Stoker died on April 20, 1912 aged 64. After suffering a number of strokes, he died in his London home at St George’s Square. Stoker was cremated and his ashes are displayed at Golders Green Crematorium. The ashes of his son, Irving Noel Stoker, were later added to his urn. It was originally planned that the ashes of his wife, Florence Stoker, would also be added to the urn but her ashes were instead scattered in the Gardens of Rest at Golders Green Crematorium.
The first copy of Dracula I bought was The Essential Dracula by Radu Florescu and Raymond T. McNally (1979). I remember walking through a discount bookstore and seeing the bright red cover with a picture of Frank Langella as Dracula on it. The word “Dracula” in large black print sent a shiver down my spine. I grabbed a copy, grateful that it was within my price range. As soon as I got home I started reading. It was an annotated version, so I quickly flipped through the book to see the footnotes and photos that would explain the novel in detail. Dracula was a life-changing book. I’ve been reading and writing about it ever since.
When I started reading Dracula, I wasn’t expecting to be taken on a culinary journey through Transylvania. But, in a surprising twist, the first few chapters in the novel read like a travelogue as Jonathan Harker takes meticulous notes in his diary. Jonathan writes about the strange new lands he is travelling through, the unusual superstitions and customs of the locals, and the foreign food he eats. He makes detailed notes to let Mina know the names and ingredients of dishes he has enjoyed during his trip to Castle Dracula. Even after meeting the uncanny Dracula, Jonathan continues to make notes about the foods and drinks on offer at the Castle, gradually realising that he is also on the menu!
To honour Bram’s Death Day, and to pay tribute to a novel that has quenched many of my culinary thirsts, I’m making a fun cocktail. It’s inspired by an awesome collection of bookmarks I found on Etsy by Cara at Sonnet and Fable. Each bookmark contains ingredients for a cocktail with a literary pun twist such as The Pitcher of Dorian Grey Goose, Tender is the Nightcap, and a Rum of One’s Own. There is no surprise about which cocktail I’m making – Bramble Stoker! The fact they were sent from Cork in Ireland adds an extra delicious connection to my favourite Irish author. Naturally my recipe contains a few twists of my own. 🙂
A classic Bramble is a combination of gin, lemon juice, sugar syrup and a blackberry liqueur called Crème de Mûre poured over ice. It’s called a Bramble as blackberry bushes are called brambles. As I didn’t have Crème de Mûre, I substituted it with Chambord (raspberry liqueur) and added blackberry cordial. I also didn’t have sugar syrup so I used a honey syrup. I didn’t use ice as today has been particularly cold in Melbourne.
Bramblish Cocktail

Ingredients
4 parts gin
2 parts fresh lemon juice
1 part honey syrup
1 part Chambord
1 part blackberry cordial

Instructions
Mix together the gin, lemon juice and honey syrup.
Pour into a serving glass.
Slowly pour the Chambord over the top.
Repeat with the blackberry cordial.
Enjoy with a good book such as Dracula.
April 17th is Bat Appreciation Day. It is one of a number of days dedicated to highlighting the importance of bats in our ecosystem and to challenge the negative attitudes some have towards bats. There are other bat days during the year such as International Bat Night which takes place on the last weekend of August. Not surprisingly, October is Bat Appreciation Month and the last week of October is designated as Bat Appreciation Week!
Having a Bat Appreciation Day in April is great for those of us who live in the southern hemisphere and celebrate Halloween at the end of April. While Halloween bats are usually depicted as black, I’ve chosen to focus on a white bat called the Honduran white bat also called the Caribbean white tent-making bat.
image from wikipedia
Honduran white bat facts: – They have bright white fur and look like little balls of fluff – Their ears, nose and lips are bright yellow – They build tents in leaves which they shape into upside down boats and roost in them – The tents protect them from the weather, are climate controlled and offer some protection from predators – They are frugivores (fruit eaters) that only eat figs and almost exclusively one species of fig
image from wikipedia
Not long after I fell in love with the Honduran white bat, Beserk, (my favourite Goth store) featured a Honduran white bat plush for sale. It was one of those synchronistic moments that really makes you think. Happily Figgy is now part of my family and is thoroughly enjoying her Figgy Upside Down Cupcakes. She thinks they look like her because they are cute, cuddly, and upside down!
Figgy Upside Down Cupcakes

Ingredients
6 tablespoons coconut flakes
6 tablespoons fig jam
1/2 cup flour
1/2 teaspoon baking powder
pinch of sea salt
60g unsalted butter, room temperature
1/4 cup caster sugar
1 egg, room temperature
1/2 teaspoon vanilla extract
3 tablespoons milk

Instructions
Preheat the oven to 180°C / 350°F.
Line a muffin pan with 6 cupcake cases.
Place a tablespoon of coconut flakes followed by a tablespoon of jam in each paper case.
Carefully spread the jam so that it covers the coconut.
Sift together the flour, baking powder and salt in a small bowl. Set aside.
In a large mixing bowl, cream together the butter and sugar until fluffy and combined.
Whisk in the egg until combined.
Whisk in the vanilla until combined.
Fold in the flour mix until just combined.
Add the milk and stir until just combined.
Spoon the batter evenly between the cupcake cases.
Bake for 15 - 25 minutes or until a toothpick inserted into the centre comes out clean.
Allow to cool for 5 minutes before removing the paper cases.
Place on a wire rack (jam side up!) to cool completely.

*some of the jam will stick to the bottom of the paper case. If you can’t bear to waste it you can just eat it with a spoon or lick it up like a fruit bat!
Some parts of Australia observe Daylight Saving Time and my state of Victoria is one of them.
Daylight Saving Time starts at 2am on the first Sunday in October. As we are entering our Spring/Summer seasons, we turn the clock forward one hour.
Daylight Saving Time ends at 3am on the first Sunday in April. As we are entering our Autumn/Winter seasons, we turn the clock back one hour and return to Australian Eastern Standard Time.
This year I took advantage of the last night of daylight savings to visit Melbourne General Cemetery.
There are some interesting graves within the cemetery as well as a shrine to Elvis Presley. We only looked at a handful, preferring to wander through and look at the various tributes and statues. One that stands out is the grave of Walter Lindrum, arguably the best billiards player in history. The grave is a billiards table, complete with balls, cue and a line of coins along the cushion – representing the players lining up even in death to challenge the champion.
During Daylight Saving Time, the cemetery is open until 8.00pm. During the rest of the year, it closes at 6:00pm. With dusk at around 7:30pm, it’s fun to wander through the graves as the sun sets and the cemetery becomes dark. The memorials become lost in the darkness except for the limited reflections from the moon and the surrounding city lights.
Many have described this experience as creepy, but I’ve always found cemeteries comforting places and this was no different. Being surrounded by darkness and the memorials to the recently and long dead warms my gothic heart.
On April Fool’s Day ten years ago, I began my blogging journey, and what a journey it has been! The last ten years have been tumultuous both personally and globally. Trying to condense the myriad of emotions swirling through me as I reach this milestone has been difficult. At first I thought I would go through my blog year by year and pick out my favourites. But as I scanned through my blog, I just didn’t feel this was right. It was when I looked up what a tenth anniversary symbolised that a seed was sown.
The traditional tenth anniversary symbol is tin or aluminium. These metals symbolise strength and flexibility, great skills to have when trying to navigate ten years of anything! When I initially tried to link these metals to food and recipes, I couldn’t find anything worthy of a tenth anniversary. Then I thought of the Tin Man from The Wizard of Oz. While I didn’t think I needed a new heart, I thought I could use the concept of an Oz-like personal journey to illustrate my ten year blog journey. I was surprised to find that, just like The Wizard of Oz, this journey would involve a witch and her broomstick!
Ever since I discovered a tradition in Norway that involves hiding brooms so witches can’t ride them on Christmas Eve, I’ve been wanting to make one of those cakes where you cut into it and there’s a surprise shape inside. My surprise cake was going to be a vanilla cake with hidden chocolate broomsticks inside! It didn’t go to plan. The broomstick cookie cutter I used was too thin, so instead of revealing perfectly formed and centred broomsticks, my surprise cake revealed snapped and broken broomsticks. I was so devastated I didn’t even photograph my disaster. But I did eat it as it was quite tasty 🙂
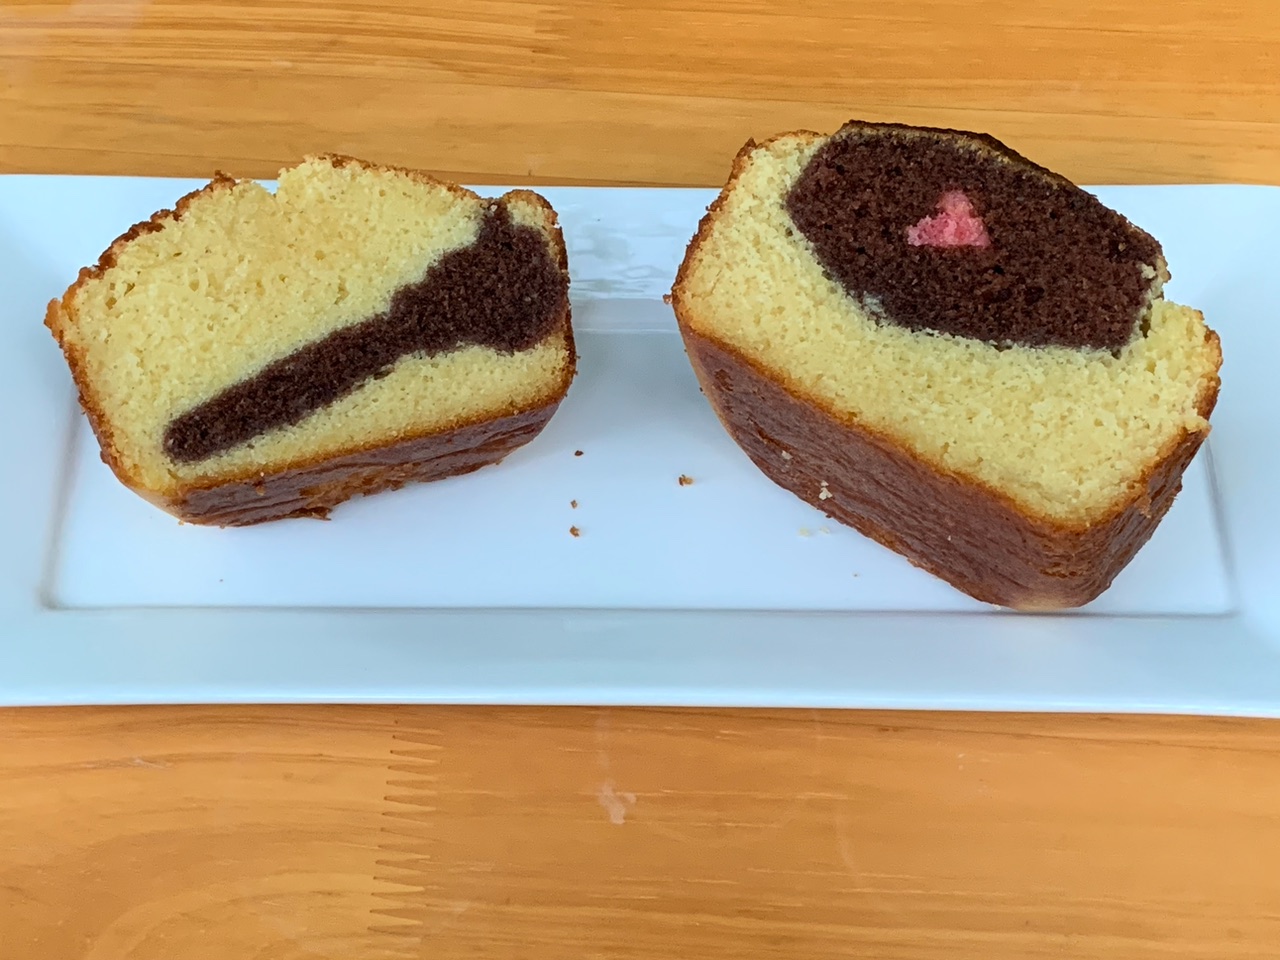
It was too late to make a Christmas Eve show stopper, but since I had bought a larger broomstick cutter, I wanted to test it out. So I came up with the bright idea of making a Halloween surprise cake with not one but two hidden shapes! Half the cake would have hidden broomsticks and the other would have coffins. I was so emboldened that I decided to complicate the already daunting task by adding a third shape. My dark chocolate coffins would contain a red heart. So with much trepidation, I set about making my second cake.
This one didn’t work either. The broomstick half looked good but this time the coffins were the problem. The coffins had floated to the top and you could see their shapes poking out. I wasn’t happy. The perfectionist in me demanded I do better. For my next attempt, I decided to just use coffins and bought a smaller cutter. I also increased the amount of vanilla batter, hoping the extra batter would hide the top and hold the coffins down so they would be perfectly centred. I also decided to cut some coffins out of the red cake and insert chocolate hearts into them for an extra colourful surprise. Then, like the tarot Fool, I set about making my third version of this increasingly traumatising cake. I had no idea where this journey would lead me.
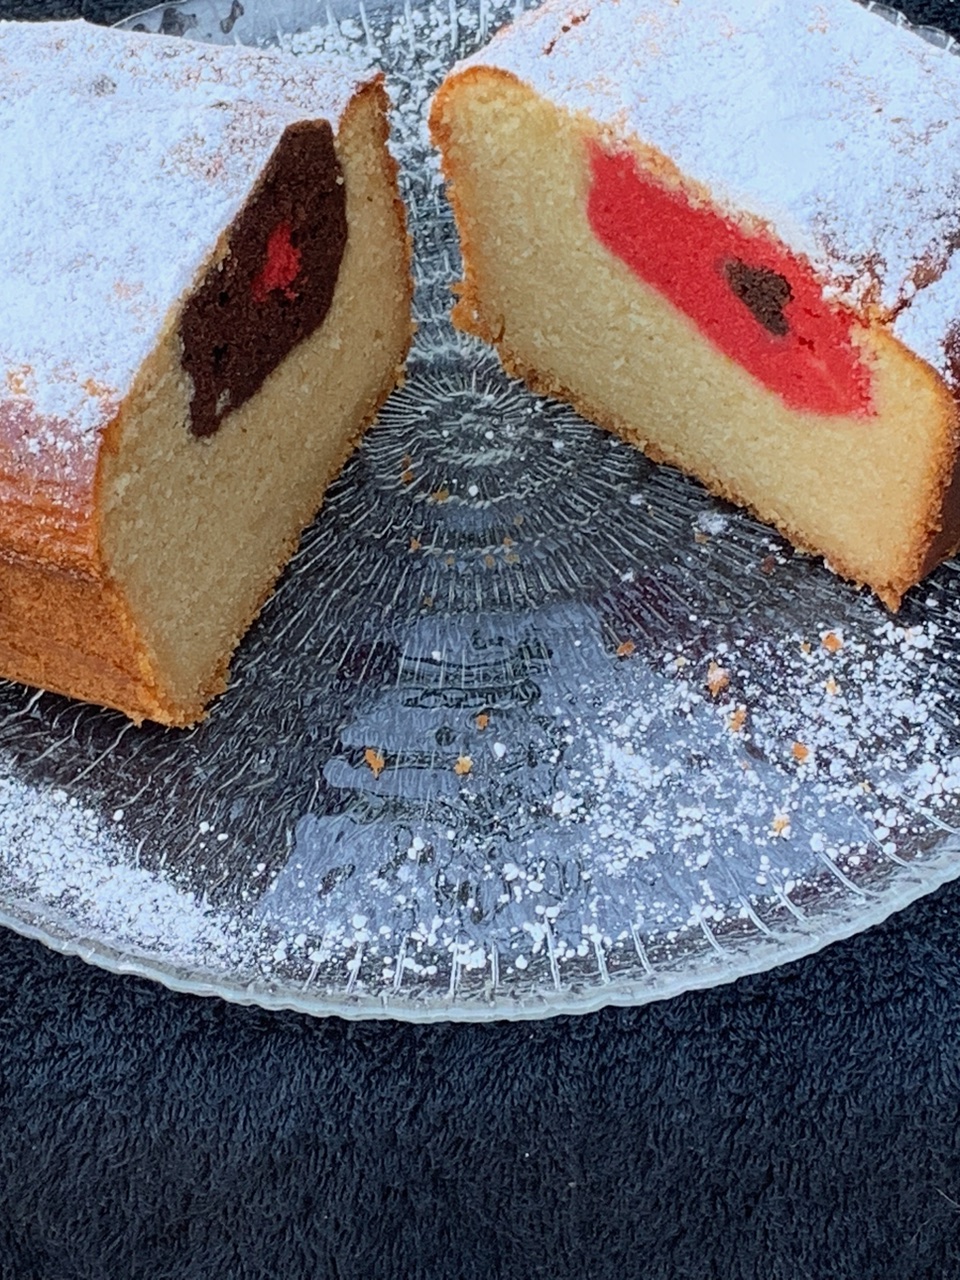
This version was an improvement but still wasn’t perfect. You could still see the tops of the coffins but they were not as obvious as before. They also weren’t centred as they had frustratingly floated to the top again. For one mad moment I was thinking of going for a fourth try, but then I stopped and really looked at the cake. I liked it. In fact I loved it. I had made a difficult cake, added an extra shape inside the coffin, and produced something that was fun, eye-catching and delicious. I’m not a professional baker. I’m just a crazy recipe researcher who loves writing recipes. So why wasn’t I happier with the result? I’m a perfectionist, but it’s really not who or what I want to be. When I looked at that not so perfect cake, I decided to give myself a break. I added a sprinkling of icing sugar to cover the rising coffin top and pronounced it done. I took photos of my beautiful coffin cake and then happily ate a large slice. It was delicious. It’s not perfect, but it doesn’t have to be.
As I looked at that cake I relished the incredible journey it had taken me on. If ever a cake could symbolise my crazy need to link a recipe to something Pagan or Gothic or anything at all, it is this one. If ever a cake could symbolise my deep faith in myself, my anger when I fail and my obsession to be perfect, it is this one. If ever a cake could resurrect my punk ingrained attitude of “I don’t care what anybody else thinks, this is my cake and I love it”, it is this one. I had struggled so much to make this cake, but I had persevered, and I was so proud of it. I don’t have to be perfect and the things that I create don’t have to be perfect. As I looked at my creation I turned to my partner and said “that cake is me!” That’s when I realised my tenth anniversary Tin Woman journey had been completed. Like the Tin Man, I had found my heart and then placed it in a coffin in a cake. The true surprise in this hidden cake was that I didn’t even know I had lost my heart to begin with.
Like most journeys the end is actually the beginning. I’ve already started thinking of new surprise cakes to make filled with fun shapes and flavours. I myself am a recipe and I’m going to keep experimenting and growing until I run out of ingredients.
Deadly Surprise Cake

Red Cake
Ingredients
1/2 cup flour
1/2 teaspoon baking powder
1/8 teaspoon sea salt
60g unsalted butter, room temperature
1/4 cup caster sugar
1 egg, room temperature
1/2 teaspoon vanilla extract
1/4 cup milk
red food colouring

Instructions
Preheat the oven to 180°C / 350°F.
Grease and flour a 24 x 13cm loaf pan.
Sift the flour, baking powder and salt into a bowl. Set aside.
Using a wooden spoon, cream the butter in a large mixing bowl until smooth and spreadable.
Add the sugar and continue creaming until combined.
Using a wire whisk, beat in the egg until combined.
Add the vanilla and beat until just combined.
Using a wooden spoon, fold in the flour mix until just combined.
Add the milk and stir until just combined.
Add enough food colouring to get your desired colour and stir until just combined.
Spoon the batter into pan.
Bake for 15 - 20 minutes or until a toothpick inserted into the centre comes out clean.
Allow to cool for 10 minutes before transferring to a wire rack to cool completely.
Using a 2 x 1.5cm heart cookie cutter, stamp out heart shapes and set aside.

Chocolate Cake
Ingredients
3/4 cup flour
1 teaspoon baking powder
1/4 teaspoon sea salt
1/4 cup dark cocoa powder
120g unsalted butter, room temperature
1/2 cup caster sugar
1 teaspoons vanilla extract
2 eggs, room temperature
1/2 cup milk

Instructions
Preheat the oven to 180°C / 350°F.
Grease and flour a 20 x 20cm square cake pan.
Sift the flour, baking powder, salt and cocoa into a bowl. Set aside.
Cream the butter and the sugar until light and fluffy.
Add the eggs one at a time and beat until combined.
Add the vanilla and beat until just combined.
Fold in the flour mix until just combined.
Add the milk and stir until just combined.
Spoon the batter into cake pan.
Bake for 30 - 40 minutes or until a skewer inserted into the centre comes out clean.
Allow to cool for 10 minutes before transferring to a wire rack to cool completely.
Using a 7 x 4.5cm coffin cookie cutter, stamp out coffin shapes.
Using the heart cookie cutter, stamp out heart shapes from the centre of the coffin.
Replace with red vanilla heart shapes and set aside.

Vanilla Cake
Ingredients
2 cups flour
2 teaspoons baking powder
1/2 teaspoon sea salt
240g unsalted butter, room temperature
1 cup caster sugar
4 eggs, room temperature
2 teaspoons vanilla extract
1 cup milk
extra icing sugar for sprinkling

Instructions
Preheat the oven to 180°C / 350°F.
Grease and flour a 24 x 13cm loaf pan.
Sift the flour, baking powder and salt into a bowl. Set aside.
Cream the butter and the sugar until light and fluffy.
Add the eggs one at a time and beat until combined.
Add the vanilla and beat until just combined.
Fold in the flour mix until just combined.
Add the milk and stir until just combined.
Pour 1/4 of the batter into the prepared cake pan.
Push the coffins into the batter (line them up sideways so they are all facing the same way)
Pour the remaining batter over the coffins making sure they are fully covered.
Bake for 60 minutes or until a skewer inserted into the centre comes out clean.
Allow to cool for 10 minutes before transferring to a wire rack to cool completely.
Place cake on serving plate.
Sprinkle with icing sugar.
Cut into slices to reveal the hidden surprise.
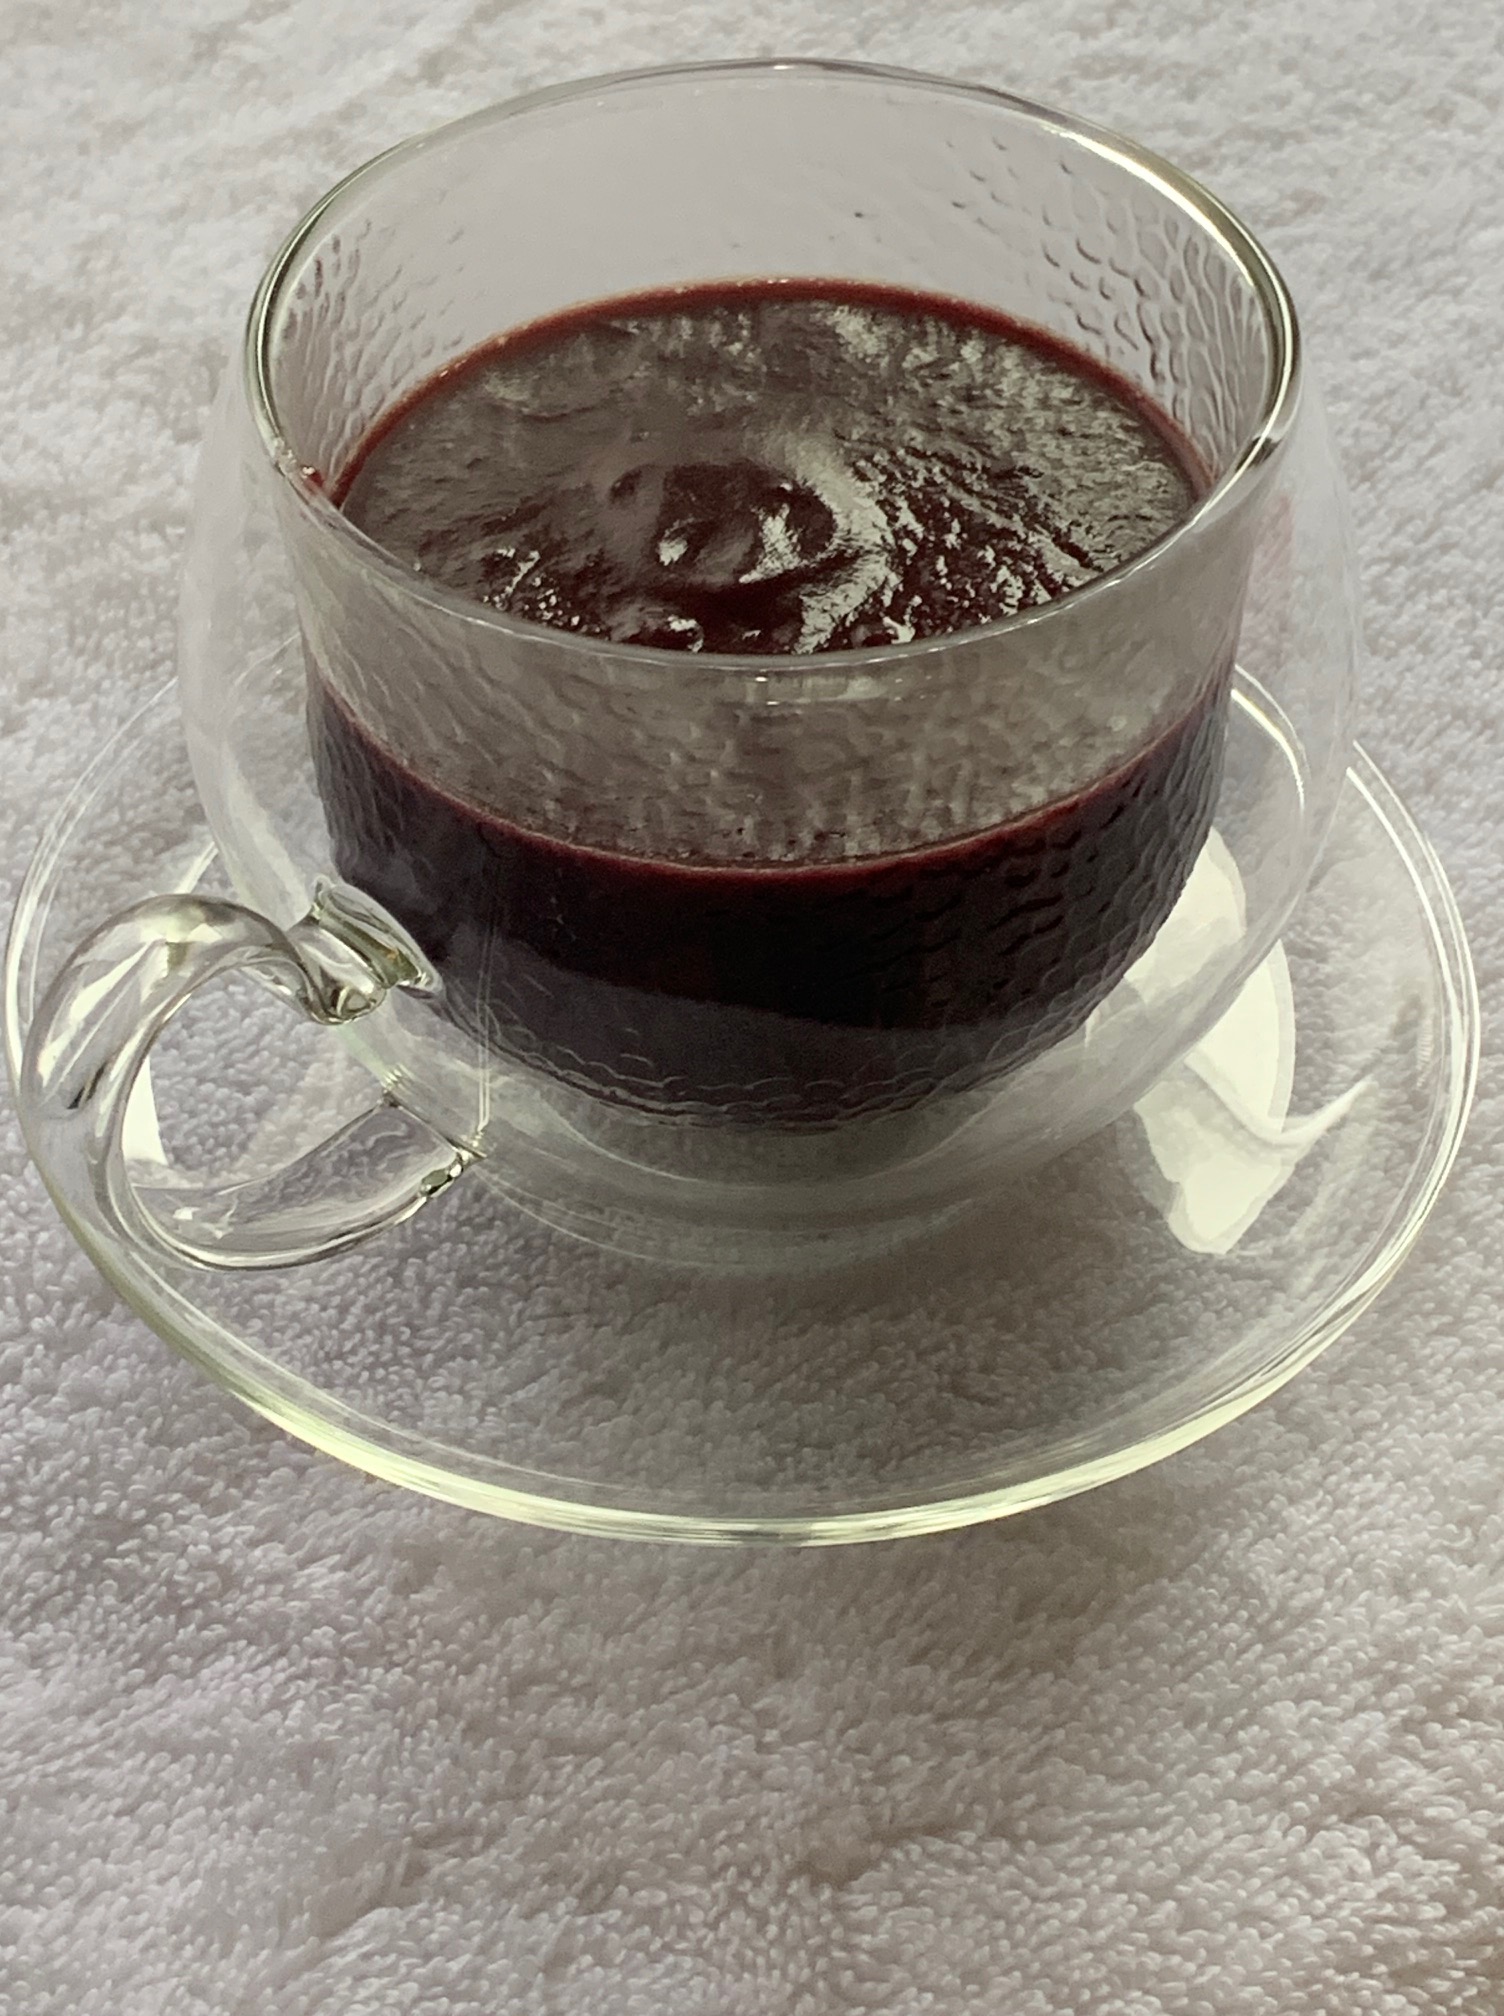
The Autumn Equinox is almost here and, like Persephone, it’s time for me to begin my Autumnal descent into the Underworld. Autumn is one of my favourite seasons, but last Autumn I became so ill I ended up in hospital. The fear that this may happen again clouded my usual happy embracing of the coming dark time of the year. To combat this fear, I recently embarked on a fun journey of discovery, as I visited numerous cafes to taste test my new favourite drink. So what is the drink that has ignited my Autumn fire? It’s a Dirty Chai. 🙂
A dirty chai combines a spiced chai latte with a shot of espresso coffee. It’s called “dirty” because the coffee changes the colour of the tea making it look muddy or dirty. But it’s not just the look of the chai that the coffee changes, but also the flavour. The coffee adds bitter, earthy flavours that perfectly balance the spicy sweetness of chai. It’s this delicate balancing of flavours that make a dirty chai perfect for the Autumn Equinox.
In fact, experimenting with your own dirty chai recipe at home could be a fun way to enjoy the Autumn/Winter months ahead. You can make your own chai blends and try different chai syrups. A pumpkin spice dirty chai would be perfect for Halloween and maybe try a peppermint dirty chai for the Winter Solstice. If you experiment with dairy and non dairy milks you could be brewing for months. If you’re heading into Spring and Summer, don’t worry. You can also join the fun by making iced dirty chais for those hot Summer days!
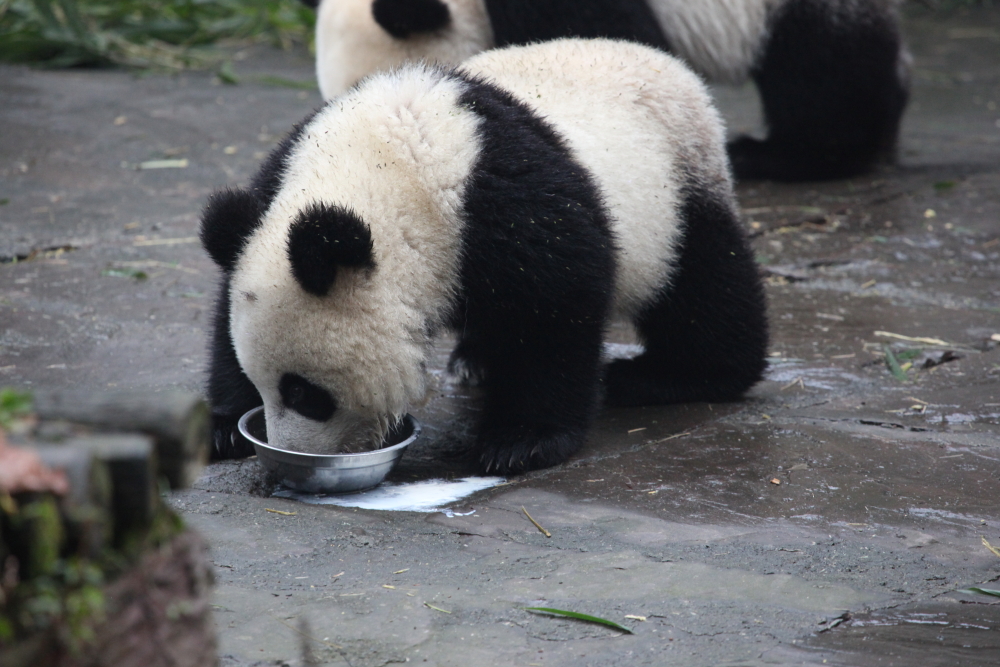
March 16th is Panda Day. It’s a day to celebrate giant pandas and to raise awareness about the important part pandas play in the ecosystem and in our lives. For those of us who love pandas, every day is Panda Day!
One of my greatest panda experiences was seeing pandas at the Bifengxia Panda Base and the Chengdu Panda Base. At the Bifengxia Base we were treated to panda cubbies doing activities we had previously seen only in panda cams – pandas riding toy horses, pandas playing on swings, pandas climbing trees, pandas sleeping in a kindergarten and pandas drinking milk from bowls! At the Chengdu base we actually got to hold a baby panda named Miao Miao. She accepted our rapt adoration and happily munched on bamboo dipped in honey!
When I started to think of what recipe I wanted to make for Panda Day, I put honey and milk together and got Panda Cotta!
Honey Panda Cotta
Ingredients 2 titanium gelatine leaves (or your choice of gelatine to set 1 + 3/4 cups liquid) 3/4 cup milk 3/4 cup thickened cream 1/4 cup honey 1/2 teaspoon vanilla extract
Instructions Soak the gelatine leaves in cold water for 5 minutes to soften. Put the milk, cream, honey and vanilla extract into a saucepan and bring to a simmer over medium-low heat, stirring to make sure the honey has melted. Remove from heat. Squeeze the gelatine leaves to remove any excess water then stir into the cream mixture until dissolved. Pour into serving bowls or glasses. Cover and refrigerate for at least 4 hours or overnight. Panna cotta is often unmolded onto a serving plate but you can just dig in with a spoon! If you’d like to unmold, here are a few tips that can help do it neatly: * Slide a knife down the side of the set panda cotta to break the air seal. * Rest the bottom of the mold (about half way up the side) in hot tap water for about 5 seconds. Dry the outside and then invert onto a serving plate. * If the panda cotta doesn’t slide out on its own, a couple of vigorous downward shakes (making sure to hold both plate and mold) should convince it to unmold.
Moomba is an annual festival held in Melbourne, Australia. The festival, which usually lasts four days, is celebrated over the Labour Day long weekend. Traditional events include the Moomba Parade, crowning of Moomba Monarchs, a Birdman Rally, carnival rides and fireworks. The word Moomba is believed to be an Aboriginal word meaning “let’s get together and have fun”. However, intentionally or unintentionally, there may be a joke embedded in the name.
Credit for the name Moomba is given to Bill Onus, an Aboriginal Australian political activist who used the word in a 1951 play called An Aboriginal Moomba: Out of the Dark. 1951 was the year that Australia celebrated fifty years of Federation and the play, along with a parade, were part of the festivities. In 1954, Queen Elizabeth II made her first visit to Australia. The huge crowds that gathered in Melbourne inspired city organisers to plan a yearly celebration. The first Moomba Festival was held in 1955. Onus suggested they name it Moomba because who doesn’t want to have a carnival that means let’s get together and have fun!
So that’s the end of the story, or is it? Well, some linguists argue that the word Moomba has a very different meaning. They suggest that in some Victorian Aboriginal languages the word “moom” (mum) is a slang term for “arse”, “bottom” or “bum” and that the suffix “ba” can mean “at”, “in”, “on” or “up”. So rather than celebrating a festival that means “let’s get together and have fun”, Melbourne’s Moomba Festival may actually be saying “up your bum!”
Did Bill Onus believe that Moomba was a word that meant festive fun, or did he play a prank by offering a name with comical connotations? Onus’ daughter-in-law has said that Bill’s wife Mary tells the story that Bill picked up the word from a list of indigenous terms. However Lin Onus, Bill’s son, says that his father suggested the name as a prank.
Because I really want this festival to mean “up your bum”, I’m posting a link to my recipe for Beer Can Chicken which uses a can of beer in a very Moombaesque way.
2024 is a leap year, meaning an extra day has been added to the year. As it takes the earth approximately 365.25 days to revolve around the sun, this extra day is added to the Gregorian calendar every four years with some exceptions. The extra day that is added is February 29th. So why do we call it a leap year rather than an extra day year?
In the Gregorian calendar, a fixed date advances one day of the week year by year. So if March 1st falls on Monday one year then it will fall on Tuesday the following year, Wednesday the next and so on. When it’s a leap year, the addition of February 29th means the following fixed dates move forward an extra day. For example, last year March 1st fell on a Wednesday, so this year it would have fallen on a Thursday, but since this is a leap year, March 1st leaps over Thursday 29th (leap day) to fall on a Friday instead. This year, the leap of dates allows us to commemorate and celebrate two successive dates with a twist of witchery.
On the first Friday in March, a midnight Black Mass is held in the town of Catemaco, Mexico. Noche De Brujas (Night of the Witches) begins a weekend of festivities which celebrate Catemaco’s “brujos” and “brujas” and its long pre-Hispanic history of magic practices. This magical place is home to a community of witches where both black and white magic are practised and honoured. Catemaco’s pre-Hispanic magical practices have now blended with Catholicism to produce an unusual mix of rituals and beliefs. Tourists from all around the world gather to celebrate this wild weekend of witchery.
On a darker note, the first warrants for the Salem Witch Trials were issued on February 29th, 1692. Normally this tragic leap year date would not be directly linked to Noche De Brujas, but, as mentioned above, this year’s leap day falls on a Thursday making it the eve of Noche De Brujas, which this year falls on Friday the 1st. This means a day to commemorate the beginning of the Salem Witch Trials and the horrors inflicted on innocent people accused of being witches and practising witchcraft will leap into a weekend dedicated to celebrating and honouring witches and witchcraft. This is a rare occurrence which usually occurs every 28 years.
To honour this witchy twist of dates I’ll be enjoying my culinary version of a Black Mass with a glass of devilled wine and a plate of witchy cookies. The wine recipe is below and you can get my witchy cookie recipe by clicking on strazzate.
Devilled Wine

Ingredients
1/2 cup granulated sugar
1/2 cup water
1 tablespoon whole black peppercorns
1 cup red grapes
750ml bottle of red wine
1 cup red grape juice

Instructions
Place the water, sugar and peppercorns in a small saucepan over medium-high heat.
Stir until the sugar has dissolved.
Bring to the boil then reduce heat to a simmer.
Simmer for 15 minutes.
Remove from the heat and allow to cool.
Pour pepper syrup into a large jug.
Add the grapes, wine and grape juice.
Stir until combined.
Refrigerate for at least 1 hour.

*to “devil” food means to make it extra spicy or peppery by adding hot spices or condiments.
As the Year of the Water Rabbit (or for some – the Water Cat) winds down, I’m reflecting on what a turbulent year it has been. I’ve had some awesome adventures, some terrifying experiences and endured some truly dark and depressive months. Thankfully the Rabbit/Cat year is ending on a high. It is with much eagerness (and some trepidation) that I get ready to welcome the beginning of the Year of the Wood Dragon on February 10th.
To say farewell and thank you to an extraordinary and transformative year, I thought a cup of warming Carrot and Mint Soup would be perfect. The soup is a reworking of the Bunny Mary drink I made to welcome in the Rabbit/Cat Year which featured carrot for the Rabbit and mint (symbolising catnip/catmint) for the Cat. To say hello and welcome to the incoming Year of the Wood Dragon, I’ve added Tarragon Croutons to my soup. Tarragon (Artemisia dracunculus) means Little Dragon, so it is a perfect ingredient for Dragon inspired treats.
Carrot and Mint Soup with Tarragon Croutons
Ingredients for the tarragon croutons 2 cups cubed bread (approximately 2cm cubes) 1 - 2 tablespoons extra virgin olive oil pinch of sea salt pinch of black pepper 1/2 teaspoon dried tarragon
for the carrot soup 1 tablespoon extra virgin olive oil 1/4 teaspoon Chinese five spice 2 carrots - purple if available (approximately 150g), peeled and roughly chopped 3/4 cup vegetable or chicken stock 1 cup water
for the mint butter 1 tablespoon unsalted butter 1 teaspoon dried mint
Instructions for the tarragon croutons Preheat oven to 180C/350F. Line a baking tray with baking paper. Place all ingredients into a bowl and mix until bread is coated. Place on baking tray. Bake for 10 minutes, give them a toss then bake for a further 5 minutes or until crisp and golden around the edges.
for the carrotsoup Heat the oil in a saucepan. Add the spice mix and cook for 1 minute. Add the carrots and stir until coated in oil and spice. Add the stock and 1/2 cup of water. Bring to a boil over high heat. Reduce heat to low. Cover and simmer for 20 - 25 minutes or until the carrots are tender. Turn off the heat, add the remaining 1/2 cup of water to the soup and blend until smooth. Reheat until hot.
for the mint butter Melt the butter in a small frying pan. Once the butter is sizzling, add the dried mint. Stir for 1 minute, being careful not to burn the mint. Remove from heat and stir into the soup.
to serve Taste for seasoning and add salt and pepper if desired. Ladle soup into heat-proof mugs or bowls. Serve with croutons.